Showing posts with label Introduction. Show all posts

Sunday, 25 November 2012

Introduction To Rational Unified Process (RUP)

This post is an introduction to the Rational Unified Process (RUP), a method driving software application implementation. It is an iterative framework, which puts it in the set of Agile methods.

Concepts

  • RUP is based on UP (Unified Process) which defines 50 optional artifacts. These are organized within disciplines.
  • Each RUP project is customized with a set of practices and artifacts.
  • RUP defines 4 phases:
    • Inception - Lasts few days, usually no iteration. Includes: Business requirement definition, scope definition, 10% of requirements are described in detail, identification of key risks, estimation of effort requirements, creation of risk list, definition of UML use cases, prototyping.
    • Elaboration - Small iterations start: coding and testing of system parts, identification and mitigation of main risks, 80% of requirements are analyzed in detail.
    • Construction - System is completed with more iteration and made ready for deployment (integrated and tested baseline). Includes: stakeholder evaluation, little new changes or requirements, performance tuning, documentation.
    • Transmission - System is deployed, starting with a release candidate. There may be multiple releases until the final release. Training is performed.
  • A Vision is the summary of stakeholder's needs and features.
  • A Design Model is a set of objects (not OO) describing how the different parts of the system to be implemented are going to work together.
  • The Iteration Plan is the set of task and objectives for the current/next iteration.
  • A Risk List with priorities, and mitigation plans.
  • The RUP roles are:
    • Stakeholders on the customer side.
    • On the implementation team: implementer, tester, architect, analyst, database designer, user interface designer.
    • The implementation is lead by a project manager, assisted by process engineers.

Practice

  • Short iterations 2 to 6 weeks.
  • Focus on high-risk and high-value elements first.
  • Reuse of existing component.
  • Accommodate changes early in the process.
  • Deliver value to the customer.
  • Team size can be 3 to several hundred.
  • Continuous verification of quality.

Conclusion

RUP is well suited-for many types of projects, though the overhead will be higher than other Agile methods for small projects. XP and Scrum are more suited for projects created from scratch or involving many new user requirements or features. RUP is efficient for migration projects, ERP deployments or large scale projects. 

TortoiseSVN vs TortoiseGit Introduction

This post is a comparison between TortoiseGit and TortoiseSVN. In an earlier post, we have explained what a trunk, branch and tags are, together with other related concepts. An introduction to Git concepts is available here, it is a prerequisite for this post.

Creating/Cloning A Repository

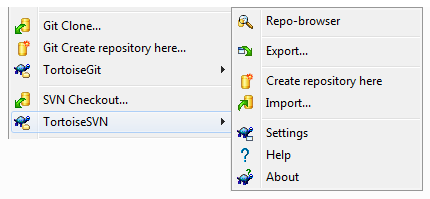
Assuming you have both TortoiseGit and TortoiseSVN installed on your PC, you can create or clone repositories to your local PC directories. Select a directory and right-click it with your mouse:


  • TortoiseGit allows you to clone an existing repository locally, or to create one from scratch.
  • For TortoiseSVN, you need to open the sub-menu to create a local repository.
  • The equivalent of Git cloning is somehow a checkout in SVN.
  • With Git, a working directory is a fully fledged Git repository (related to the original repository if it was cloned). Cloned repositories can be cloned themselves. You can create chains of repositories.
  • When using a SVN checkout, the working directory is not a SVN repository. It is only a local checkout of the corresponding repository content. One cannot perform a checkout on a checkout in SVN.
  • The export function in TortoiseSVN is about obtaining a copy of files in a repository, but without the meta-data required to record changes made to this content. In other word, this will not be a working directory from a SVN perspective. This function is also available in Git once the repository is created or cloned.
  • TortoiseSVN also offers an import function, which is typically used to import the directory structure within the local directory, into the repository. This function is seldom used. People will rather perform a check out, create directories locally, and commit them.
  • At last, TortoiseSVN offers the Repo-Browser functionality which allows one to work on/browse a repository without checking it out. That same functionality is available in TortoiseGit once the repository is created or cloned.

Sync/Update And Commit

If you right-click the Git or SVN working directory, a different set of functionalities are offered:
  • A Git Sync is a Pull and a Push at the same time (we will cover these operations later). In SVN, the corresponding operations would be Update and Commit.
  • A Git Commit registers modifications made to files in the working directory.
  • A SVN Update imports locally all code committed by other developers into the repository since you performed you last check-out or last update. In others words, it makes your local directory in sync with the repository. This method is also available in Git as Update To Revision once the repository is created or cloned.
  • A SVN Commit is the operation pushing your local directory modifications back to the repository.

Additional Commands

About commands in common:
  • Show Log - Displays the list of commits performed on the directory. 
  • Check For Modifications - Shows the list of file modifications together with files which have not been added for versioning/revision in the repository.
  • Resolve(d) - Sometimes, code conflicts between (remote) repository or branches and the local (working) directory need to be decided and resolved. It can be a matter of giving preference to the local or remote code. This functionality helps resolve this.
  • Revert - If you don't like the uncommitted modifications you have made so far to your files, you can retrieve the original version in the repository. Think at this functionality as a rubber.
  • Clean Up - If something happened while a command was performed, the system may be left in an unstable or unclean status. This command help clearing the mess.
  • Rename - Helps renaming a file or folder in the local directory. One should not use the typical windows explorer rename function, because Git and SVN would not be notified and it would be impossible for them to maintain continuity between files.
  • Delete - Removes a files or a directory in the local directory. Just like for renaming, one
    should not use the typical windows explorer delete function, because Git and SVN would not be notified and it would be impossible for them to maintain continuity.
  • Switch - Assuming you are working on trunk (SVN) or master (Git), or a branch, this method helps you shift between these back and forth, rather than checking them out in another local directory.
  • Merge -  This allows one to merge the modifications made in a branch back to trunk/master (or any other source branch it was created from).
  • Create Branch/Tag - Simply allows the creation of branches and tags.
  • Settings - Enables configuration of TortoiseGit and TortoiseSVN.
  • Add - Tells Git and SVN to take files into consideration for the next commit. In Git, this is called staging.
  • Create Patch (Serial) - This method is about creating patch from modifications made in the local directory.
  • Apply Patch (Serial) - This functionality is about applying patches to the  local directory.
  • Help - Provides documentation about TortoiseGit and TortoiseSVN.
  • About - Provides information about TortoiseGit and TortoiseSVN.
About TortoiseSVN specific commands:
  • Revision Graph - Displays a graph of branches and tags in the repository.
  • Get/Release Lock - Allows one to lock some files in the repository, to make sure no other engineer modifies them while one is working on it locally.
  • Relocate - If the repository has changed of location, this functionality has local checkout point to that new location.
About TortoiseGit specific commands:
  • Fetch - This functionality retrieves modifications from a remote source back to the local repository, but does not merge them.
  • Pull - This is a fetch with merging.
  • Push - This function pushes current modification to a remote repository.
  • Diff (With Previous Version) - Displays staged differences made in the working directory.
  • Rebase - A complex function allowing to move modifications made to a branch back to master (or any other branches), without keeping a continuity trace in the logs.
  • Stash Save - Saves current work made in the local directory without committing it into the repository.
  • Bisect Start - Helps finding a revision that caused an issue and move the HEAD pointer accordingly if necessary.
  • Submodule Add - Adds another Git project/repository in this repository, while keeping commits separated.

Saturday, 24 November 2012

Introduction To Git Concepts

This post is an introduction/reminder to Git concepts. It aims at facilitating the learning curve for those coming from a Subversion (or other) background. For more details, there is nothing like the official book.

Concepts

  • Git operates on repositories which contain a local database of files and corresponding file revisions.
  • Repositories contain files which can have 3 states:
    • Committed - The file is stored in the database.
    • Modified - The file has been modified, but has not been stored in the database.
    • Staged - The file has been  modified and flagged as to be committed in the database.
  • A file can also be considered as untracked by Git. It has no status, until it is added to the working directory. The add function can be used to stage a file.
  • When cloning or creating a Git repository to a local directory, this directory will contain:
    • A Git directory containing the local database and all meta information corresponding to the repository.
    • A staging area file containing information about what will be included in the next commit.
    • The remaining content is called the working directory, which contains files (extracted from the database) corresponding to a specific version of modifications stored in the database.
  • Typically, files are modified in the working directory, then staged for commit, then committed into the repository database.
  • It is possible to ignore files in a repository by marking them as such in the working directory. They will not be stored in the local database.
  • It is possible to remove files from the Git repository, or to move them around in the working directory.

  • When cloning a repository locally, its origin (i.e., the original repository) is registered in the local repository as a remote repository. Several remote repositories can be attached (added) and detached (deleted from) to your local Git repository.
  • One can fetch all data from a remote repository (including branches). This operation will not merge this data with your local work though.
  • One can also pull all data from a remote repository, which is like a fetch and automatic merging.
  • Pushing your repository content to a remote repository is like a pull, but the other way round. All modifications transmitted and merged on the remote repository.

  • One can create tags (of content at a specific version). Eventually, this tag can be annotated with information, such as tag creator, email, etc... It is possible to sign tags too (in a cryptographic way). Signed tags can be verified.

  • One can create branches too. Technically speaking, these are pointers to a specific version in the database repository. The default branch is called Master.
  • In order to remember which branch you are working on, Git has a specific pointer called HEAD.
  • One can use the Git checkout command to switch back and forth between branches. This will update the content of the working directory accordingly.
  • Modifications made to files in different branches are recorded separately.
  • Once a branch has reached a stable level, it can be merged back to Master (or any other branch it came from). Then, it can be deleted.
  • Eventually, a branch can be closed and deleted without merging modified content. This content is lost forever.
  • Branches can evolve independently. If so, a merge operation will first find a common ancestor and create a new version in the Master (or any other target branch). This version will contain both the modifications of the target and merging branches.
  • It is possible to work with remote branches from remote repositories too.
  • Rebasing is about merging the content of a branch back to Master (for example). When there is only one branch, it is not different than a simple merge, except that the log history will not contain the entries (versions) of the rebased branch anymore. This functionality is mostly useful when there are multiple branches created from multiple branches in a Git repository. You may want to merge a branch while keeping alive others having common ancestors.
  • Be careful with rebasing, because if other people were working on that branch (i.e., it is public) or any sub-branches, the continuous integration continuity will be broken for them.

  • Fast Forwarding is the process of moving a branch pointer forward. For example, a branch A is created from Master. Work is performed on A and merged back to Master. The Master pointer may lag behind to an earlier version not containing the merged changes. It can be fast forwarded to the version containing those merged changes.
  • Stashing is the practice of saving unfinished work aside without committing it yet. This allows one to switch branches without committing work in progress.
  • Submodules is a mean to import another Git project into your Git project, but with keeping the commits separated. This is useful when that other project is about developing a library which will be used in several Git projects.

Wednesday, 21 November 2012

Introduction To Extreme Programming (XP)

This post is an introduction to Extreme Programming (XP), another of the Agile methods for software application implementation. Reading this post is a prerequisite to this post.

The underlying philosophy of Extreme Programming is to take the best elements of software engineering and bring them to an "extreme" level. If a little is good, more will necessarily be better. XP believes that changes are unavoidable in project implementation. Hence, it does not make sense to define a stable set of requirements.

Core Practices & Values

Extreme Programming operates on 12 core principles:
  1. Planning Game - It is the planning process happening at the meeting happening at the beginning of an iteration. It includes release planning and iteration planning.
  2. Small Frequent Release - The iteration cycle is 1-3 weeks.
  3. System Metaphors - A user description of what the system should do. It helps drive the direction of the project and expectations. In the UML paradigm, this would be the set of use cases.
  4. Simple Design - This is Occam Razor's principle applied to project implementation. The code should not do more than what satisfies requirements. If something is not needed, do not implement it.
  5. Testing - XP favors test driven development, where unit tests are executed frequently to check for any regressions. Users also define acceptation tests, to make sure required functionalities meet expectations. These should be automated and not require human intervention.
  6. Frequent Refactoring - Refactoring is either about producing clearer and clearer code, or modifying it to respond to new or revised requirements.
  7. Pair Programming - All code is created by two people working at the same working station (one creative mind and one pragmatic mind). It is not about mentoring. Pairs are not fixed and can be reorganized. One purpose is to increase productivity, the other is to spread the knowledge of the implemented project.
  8. Team Code Ownership - Everyone is responsible for all the code.
  9. Continuous Integration - All developers work on the same code base, to prevent integration issues.
  10. Sustainable Pace - It is about avoiding excessive stress which often leads to low quality or buggy code. Overall, speeding up the process too much leads to increased cost in debugging and improving bad quality code. An optimum speed has to be found. XP does not promote overtime.
  11. Whole Team Together - The team should operate from the same room. It is not only about the development team, the customer should be on hand at all times and available for questions.
  12. Coding Standards - The code that looks the same all over the application is easier to read and to understand.
The 4 values of XP are: communication, simplicity, feedback & courage.

Concepts

  • Stories are written by the customer who describes what he does as part of his job. The closest concept in UML would be a use case.
  • There are 6 main roles in XP:
    • The customer writes stories and acceptance tests. He picks for them for product releases and iterations.
    • Programmers write code, tests, refactors code, identifies tasks to be performed and estimates time to perform them.
    • Testers help customer write acceptance tests.
    • The Coach has the role of a teacher and checks the evolution of the process.
    • The Tracker collects metrics, monitors progress.
    • Consultant is usually any technical consultant.
  • Release Planning Game is the process of defining which features should be part of the next software application release. Which stories should be included? Programmers estimate the difficulty of each task.
  • Iteration Planning Game is the process of choosing stories to implement by the next iteration.
  • Task lists are the set of task each developer must perform by the next iteration.

Practice

  • XP does not promote the creation of an overall design specification document.
  • Keep documentation to a minimum.
  • Teams should be made of maximum 10 developers.
  • Project should not last more than one year.
  • Code reviews should be frequent.
  • XP projects life cycles are made of several phases:
    • Exploration - Prepare enough story cards for the first release, make sure the project is feasible (prototypes).
    • Planning - Agree on date and stories for first release, perform release planning game, create more story cards if necessary.
    • Iterations to 1st release - Implement tested system, perform iteration planning game, task definitions...
    • Productionizing - Operational deployment, documentation, training...
    • Maintenance - Enhancement, bug fixing, major releases (incremental or not)... 

Conclusion

Extreme Programming is assuming that the customer is highly available and capable of expressing all his needs. Stories are not as precise as UML cases. Refusing to make detailed analysis when necessary can be counter-productive in many projects. Letting the customer make request changes informally does not help setting a sustainable pace too.

XP maximizes the division of work responsibilities and roles. It is consuming a lot of resources. It tends to focus more on efficiency than effectiveness. Pair programming is also not adapted to everyone's psychology, and making everyone responsible for all the code is overkill in most project. People's time is not always consumed efficiently.

To be efficient, XP requires an environment having a lot of resources and willing to live on the edge (like Formula 1 racing). It is not adapted to migration projects, or projects implementing complex systems including high security for example. Waterfall or Scrum will be more appropriate.

Tuesday, 20 November 2012

Introduction To Scrum

This post is an introduction to Scrum, one of the Agile methods to drive software application implementation. Reading this post is a prerequisite to this post.

Concepts

  • Scrum projects deliver software application features iteratively.
  • Each iteration is called a sprint.
  • Scrum projects have 4 stages:
    • Planning - Definition of the vision, budget, and expectations. The first version of the product backlog should containing enough implementation items for the first sprint.
    • Staging - This is the first iteration where the requirements and product backlog created in the planning are refined.
    • Development - It is the set of sprints required to implement the project fully. It ends when the product backlog is empty.
    • Release - The final product is deployed, training is performed, documentation is finalized, etc... The release backlog can be used as the product backlog for the next release of the product.
  • There are 4 main roles in scrum projects: team member, product owner, stakeholders and scrum master:
    • A product owner is a customer representative acting as a single point of contact on the customer side.
    • A stakeholder is anyone having a vested interest in the project, providing information about requirements and participating to the decision process of features to be implemented.
    • A scrum master is a facilitator and single point of contact on the development team side. It is a support function, not a 'controlling chief' role. It is a mix between a team leader and a software engineering role, which does not include people management or profit & lost responsibilities.
    • A team member is a software engineer.
  • Scrum of scrum can be implemented when multiple scrum teams are working on the same large project. Scrum master and product representatives get together.
  • The product backlog is a list of features, use cases, enhancement, defect, etc... to be implemented in the project's forthcoming sprints.
  • The release backlog is the list of features, uses cases, enhancement, defect, etc... which are postponed to the next version of the project (not next sprint).

Practice

  • Spring teams typically do not have more than 7 members.
  • A sprint duration is 30 days.
  • Scrum projects are client-driven. They select the features to be implemented.
  • Each sprint begins with two meetings:
    • The stakeholder meeting, with the scrum master and customer representative to re-prioritize the product backlog and update the release backlog.
    • The product owner and team meeting where tasks are created from the product backlog.
  • Each task must require between 4 and 16 hours of work. Bigger tasks must be subdivided into smaller tasks.
  • The scrum master and product owner check whether there are enough resources to support the efforts required to achieve the sprint and adjust the workload accordingly.
  • Team member pick their tasks and work on their implementations.
  • Each spring finishes with a presentation of implemented features to the stakeholders.
  • Every day, a stand-up meeting (15-20 mins) with the team members and eventually the product owner is organized in front of a white board. The following is discussed:
    • Which tasks have been achieved since the last meeting?
    • Are there new tasks? New requirements?
    • What is blocking? Any impediments?
  • If decisions have to be taken, the Scrum Master should take them quickly, within an hour if possible
  • The Scrum Master should deal quickly with any impediments and communication issues
  • Scrum teams should preferably operate from the same room

Conclusion

As for all Agile methods, the Scrum approach is best suited for new projects created from scratch. Over time, when successive application releases are implemented, the project can slowly transform into a continuous integration or even maintenance project, where less stakeholders input or daily supervision is required. The cogs are well oiled and operate naturally.

Monday, 19 November 2012

Introduction To Agile Principles

This post is a reminder about Agile principles. It is also an introduction for those who want to learn about it. The Agile principles were initially proposed in 2001 in the Manifesto for Agile Software Development which defines 4 values and 12 principles.

Several project implementations methods were already available then, but many found these inflexible, cumbersome or unadapted. Some tried to apply them with too much orthodoxy and rigidity, went far beyond planned budgets and did not manage to produce operational software. Those who did deliver a product often saw end users refusing to use it. The end result was far from their real needs and expectations.

Agile is a reaction to the think & plan first → design everything → implement everything → test everything → deliver everything mentality (waterfall). Secluding each step of the software process development proved to be a failure in many cases, especially when developing new software from scratch.

By focusing on iterative development, (i.e., successive deliveries of software parts and functionalities with frequent customer feedback), Agile is aiming at being rapid and flexible in response to changes. Project are kept small to maximize success rates. Iterative methods were existing long before Agile. Agile is extending the concept and principles.

Agile Manifesto Values

  • Individuals & Interactions over processes and tools - When reading maps, some people tend to try to confirm that they are indeed where they think they are on the map, rather than taking indications on the ground and use these to find their position on the map. The map should only be a support to human interactions, not the other way round.
  • Working software over comprehensive documentation - Excessive planning and design used to plague many projects. The process was too intellectualized and disconnected from the final product and user needs.
  • Customer collaboration over contract negotiation - Customers know best about their needs (what the product should do), not the designer and software engineer. By getting the customer engaged, one also gets their approval on the delivered product.
  • Responding to change over following a plan - Setting rigid project milestones, with a predefined set of tasks, fails on many occasions. The customer rarely has a fully detailed picture of the product he wants or needs. Design and gathering of needs is an ongoing process.

Agile Manifesto Principles

  1. Our highest priority is to satisfy the customer through early and continuous delivery of valuable software - Customer likes to see where the money is going. The more they see something substantial, the more they trust the process, and the more they get engaged.
  2. Welcome changing requirements, even late in development. Agile processes harness change for the customer's competitive advantage - Devil is in the details, and sometimes, these lie under several layers of analysis and design. For new software, some real practical requirements are only discovered late in the process. These are essential and must be accommodated for.
  3. Deliver working software frequently, from a couple of weeks to a couple of months, with a preference to the shorter timescale - This practice guarantees that expectations are met and that the project does not go in the wrong direction. Frequent customer feedback is the lighthouse.
  4. Business people and developers must work together daily throughout the project - Developers usually have little managerial decision power, yet their daily work depends on managerial decisions which must be made for the project to flow.
  5. Build projects around motivated individuals. Give them the environment and support they need, and trust them to get the job done - This is about empowerment and people management. It is not specific to Agile only.
  6. The most efficient and effective method of conveying information to and within a development team is face-to-face conversation - Self-explanatory.
  7. Working software is the primary measure of progress - Again, this principle helps avoiding never-ending projects.
  8. Agile processes promote sustainable development. The sponsors, developers, and users should be able to maintain a constant pace indefinitely - This is achieved with face-to-face communication and frequent deliveries of product features, plus frequent customer feedback.
  9. Continuous attention to technical excellence and good design enhances agility - This is a tautology.
  10. Simplicity--the art of maximizing the amount of work not done--is essential - It is complicated to keep things simple, to resist the temptation of including too many technologies or frameworks. Overkill is common in software implementation. The purpose is to satisfy requirements, not optimizing the last lemon drop. The investment is often not worth the return.
  11. The best architectures, requirements, and designs emerge from self-organizing teams - Again, this is about resisting implementing large strategic plans or theories, and trust the process and people.
  12. At regular intervals, the team reflects on how to become more effective, then tunes and adjusts its behavior accordingly - This nothing but debriefing in action.

Implications

By following Agile principles and values:
  • Implementation teams practice iterative development, by collecting customer needs, implementing them progressively, with frequent releases (a.k.a. incremental delivery)
  • This implies some kind of evolution of user requirements over time
  • Programming and testing starts early, alongside analysis
  • At each iteration, the client chooses the next features to implement
  • Each team member takes ownership of the tasks they will achieved and decide how to implement them until the next iteration
  • The riskier and most complex requirements are dealt with first
  • Each iteration has a fixed duration (1-4 weeks), which cannot be changed
  • Once features have been selected for an iteration, no changes are allowed
  • Complete features before moving to the next one
  • All this helps reducing the cone of uncertainty of requirements (Mc Connell)

Key To Success

  • Identify what the customer values
  • Identify stakeholders and make sure they have a vested interest in the project's success
  • Make sure there is a customer representative (single point of contact)
  • Favor consensus in team decisions, whenever possible
  • Break large tasks into smaller tasks
  • Focus on delivery, not process compliance
  • Master technical details and skills required to succeed
  • Facilitate communication channel between all involved parties
  • Have people put their ego in their pocket
  • Practice open  information as much as possible and necessary
  • Use feedback, both from customer and development team to improve
  • Avoid long term planning

Conclusion

Agile methods are not silver bullets for all situations. They are best when developing a new software application from scratch or for continuous integration projects. However, waterfall remains more appropriate when upgrading an ERP or when converting an existing application from one technology to another.

The most famous Agile methods applying Agile principles and values are Scrum and Extreme Programming (XP). There is also Adapative Software Development, Crystal methods, Dynamic Solutions Delivery Model (DSDM), Feature-Driven Developpment (FDD), Lean Development and Pragmatic Programming.

Sunday, 11 November 2012

Introduction To Spring JPA Data Features

This post is a quick introduction to Spring JPA Data's (SJD) features. This Spring module is built on top of the Spring Data Commons module, which is a prerequisite read in order to understand this post.

Features

This module offers several features:
  • JpaRepository<T, ID extends Serializable> - This interface extends the CrudRepository and PageAndSortingRepository interfaces of the Spring Data Commons module. It offers a couple of extra flush, find all and delete operations. See here for an operational example.
  • JPA Query Methods - This is a powerful mechanism allowing Spring to create queries from method names in classes/interfaces implementing Repository. For example: List<Invoice> findByStartDateAfter(Date date); is automatically translated into select i from Invoice i where u.startDate > ?1.
  • @Query - Queries can be associated to methods in Repository classes/interfaces. For example, a method can be annotated with @Query("select i from Invoice i where u.startDate > ?1")
  • @Modifying - This annotation can be used in combination with @Query to indicate that the corresponding query will perform modifications. Hence, any outdated entities are cleared first.
  • @Lock - This annotation is used to set the lock mode type (none, optimistic, pessimistic, etc...) for a given @Query.
  • JpaSpecificationExecutor and Specification - This interface adds a couple find and count of methods to repository classes/interfaces. All, have a Specification  parameter, which add predicates (i.e., where clauses) to corresponding queries.
  • Auditable, AbstractPersistable and AbstractAuaditable - The Auditable interface allows one to track modifications made to an entity (creation, last modification...). The AbstractPersistable and AbstractAuditable are abstract class facilities avoiding the boilerplate code.
  • MergingPersistenceUnitManager - If a developer decides to modularize his/her application, he/she may still want to use a unique persistence unit, even though they are declared in separate XML file. The MergingPersistenceUnitManager solves this issue.
At last, to enable JPA repositories, the:

    @EnableJpaRepositories("com.my.repositories")

should be set on a Java @Configuration class.

More Spring related posts here.

Introduction To Spring Data Commons Features

This post is a quick introduction to Spring Data Common's (SDC) features.

Features

This Spring module provides a set of interfaces to manipulate data in repositories:
  • Repository - This is a marker interface indicating which object are going to access the repository.
  • CrudRepository<T, ID extends Serializable> - This interface extends Repository and provides a set of CRUD (Create, Read, Update, Delete) methods to manipulate T objects having ID as a key.
  • PageAndSortingRepository<T, ID extends Serializable> - This interface extends CrudRepository and provides method to fetch T objects in a sorted way or using pages.
  • Pageable & PageRequest - The Pageable interface is implemented by PageRequest. Page requests are created to indicate which page and page sizes should be used to fetch objects from the PageAndSortingRepository interface.
  • Page<T> - This interface contains the fetched objects returned for a given page request.
The above repository interfaces can expose too many methods for some developers. For example, one may not be comfortable with the idea of exposing write methods. The solution is to create your own customized repository interface and annotate it with:

    @RepositoryDefinition(
        domainClass=MyClass.class,
        idClass=MyClassID.class)

Then, copy the the repository methods you want to expose in this customized interface and Spring will deal with them.

There are situations where developers want to implement their own repository interfaces by extending the repository interfaces available in SDC. However, these interfaces should not be instantiated in their applications. To prevent this, they can use the @NoRepositoryBean on these customized interfaces.

More Spring related posts here.

Wednesday, 24 October 2012

Introduction To REST Concepts

Introduction

This post aims at demystifying the REST (Representational State Transfert) web design concepts. REST is based on a client server model. REST is a set of principles describing how standards can be used to develop web applications, for example. Its main purpose is to anticipate on common implementation issues and organize the relationship between logical clients and servers. You could call it a set of best practices!

In practice, REST provides guidance on how to implement web application interfaces to the web. Typically, one says a web application is constructed in a REST-like way or not. REST is often associated (or implemented) with HTTP, but it could be implemented with other technologies too. REST is platform and language independent.

Roy Fielding, the inventor of REST, says REST aims at achieving the following:
  • Generality Of Interfaces - All web applications should implement their interfaces the same way. By sharing the same convention, other applications know how to call yours, and you know how to call theirs. Minimal learning curve for each new application.
  • Independent Deployment of Components - Once an application and its REST interfaces have been implemented and deployed, one must be able to implement or re-implement, and deploy any REST interfaces without having to rewrite or modify existing ones.
  • Encapsulate Legacy Systems - Existing applications which are not implemented in a REST-like way can be wrapped with REST interfaces, making them REST-like applications.
  • Intermediary Components To Reduce Interaction Latency - For example, in order to handle traffic, it is common to distribute user/client requests to several physical servers (which is not to be confused with logical servers). This is transparent for users. Since REST uses interfaces, implementing or adding extra layered components, such as physical servers to handle a peak of client requests, is easy.
  • Emphasizing The Scalability Of Component Interactions - This is complementary to the previous point. 
  • Enforce Security - Exchanging information over the Internet can be risky. Hackers can use it to twist the system. REST principles eliminate many of those risks.

Concepts

  • Resource - A logical resource is any concept (car, dog, user, invoice...) which can be addressed and referenced using a global identifier. Typically, each resource is accessible with a URI when implementing REST over HTTP (for example: http://www.mysite.com/invoice/34657).
  • Server - A logical server is where resources are located, together with any corresponding data storage features. Such servers do not deal with end user interfaces (GUI).
  • Client - Logical clients make requests to logical servers to perform operations on their resources. For example, a client can request the state of the resource, create a resource, update a resource, delete a resource, etc... Clients do not possess resources or corresponding data storage features. However, they deal with end user interfaces (GUI).
  • Request and Responses - The interactions between client and servers is organized with requests from client to server, and responses to requests from server back to client. Requests can contain representations of the resource.
  • Representation - A representation is a document representing the current status of a resource. It can also be the new desired status when a client makes a request to update a resource, for example.

Principles

Here are some principles applicable in REST-like applications:
  • The state of a resource remains internal to the server, not the client - The client can request it, or update it with requests made to the server.
  • No client context saved on the server between requests - The server must not store the status of a client. Otherwise, this would break the scalability objective of REST when reaching a couple million users. Remember that requests can be distributed to several physical servers, which could cause physical resource consumption issues.
  • Client requests contain all information to service it - No matter which request is sent by a client to a server, it must be complete enough for the server to process it.
  • Session states are stored on the client side - If necessary, any information about the status of the communication between a logical server and a logical client must be held on the client side.
  • Multiple representations of a resource can coexist - The chosen format used to represent the state of a resource in requests and responses is free (XML, JSON...). Multiple formats can be used.
  • Responses explicitly indicate their cacheability - When a server returns a response to a request, the information it contains may or may not be cached by the client. If not, the client should make new requests to obtain the latest status of a resource, for example.
  • Code on Demand - This is an optional feature in REST. Clients can fetch some extra code from the server to enrich their functionalities. An example is Javascript.
About session states, implementing a login logout (i.e., authentication) system between a physical server and a physical client requires saving session information on the server side. Otherwise, if it were saved on the client side, it could be hacked from the client side.

There is a general agreement that whatever 'resource' is required to implement authentication between the client and the server is considered out-of-scope for REST. These authentication resources do not have to follow REST principles (see here for more details).

REST Over HTTP

When implementing REST over HTTP, the logical REST client is typically a web browser and the logical REST server is a web server. The REST API (or service) must be hypertext driven.

About resource IDs:
  • The preference is given to nouns rather than verbs to indicate the type of a resource (cat, dog, car...).
  • The unique ID of a resource is a URI, for example: http://www.mysite.com/invoice/34657.
  • A group of resources can also be accessed with a URI, for example: http://www.mysite.com/user/7723/invoices.
It is also considered good practice to use URIs in resource representations when a resource refers to another resource. For example, in a XML document representing a resource:
<dog self='www.mysite.com/dog/923' >
    <name>Lassie</name>
    <owner ref='www.mysite.com/owner/411' />
</dog>

In order to perform operations on resources, simple HTTP is used to make calls between machines. HTTP knows several types of calls: PUT, GET, POST, DELETE, HEAD, CONNECT, PATCH, TRACE and OPTIONS.

However, REST only uses four: PUT, GET, POST and DELETE.
  • GET - Clients can request the status of a resource by making an HTTP GET request to the server, using the resource's URI. REST requires that this operation does not produce any side effect to the resource's status (nullipotent).
  • PUT - Creates a new resource. Since the client does not know the next invoice number, the URI can be: http://www.mysite.com/invoice. If the resource is already created, it is not recreated. In other words, a REST PUT on http://www.mysite.com/invoice/841 (for example) is (and must be) idempotent. Invoice 841 must not be created multiple times if clients call that PUT several times.
  • POST - REST requires POST client requests to update the corresponding resource with information provided by the client, or to create this resource if it does not exist. This operation is not idempotent.
  • DELETE-  This operation removes the resource forever. It is idempotent.
REM: Implementing a http://www.mysite.com/invoice/add  URI is not considered a REST compliant pratice.

The format (JSON, XML...) used to return representations of resources is set in the media type of the server response (Multipurpose Internet Mail Extensions - MIME).

In order to handle success or errors issues, HTTP REST recommends using one of the HTTP Status Code.

Additional Read

Wednesday, 12 September 2012

Quick Introduction to SiteMesh Concepts

Sitemesh is a small framework facilitating the development of harmonious layouts of web pages across web applications. Instead of maintaining look-and-feel code in each page, this code is grouped in templates. When a page is rendered, its content is extracted and wrapped into a template to generate the final page (decoration).

Sitemesh is integrated with the Servlet technology via filters. Decorators (i.e. templates) are JSP files declared in a WEB-INF/decorators.xml file. These decorators rely on a specific JSP tag library:
<%@ taglib uri="http://www.opensymphony.com/sitemesh/decorator"
        prefix="deco" %>
These tags are used in the templates to extract the content of the page to be decorated. For example:
  • <deco:body /> - Extracts the body content of the page to decorate
  • <deco:head /> - Extracts the head section of the page to decorate
  • ...
Sitemesh is configured with the WEB-INF/sitemesh.xml file. This is where the page parser and mappers to decorators are defined. Sitemesh comes with a set of decorator mappers (localization, browser compatibility...) to solve common requirements.

For more details about Sitemesh, see here.

Friday, 7 September 2012

What The !@"#[: Are Maven Parent Projects?

All Maven projects have a parent project. If not declared explicitly, a project will automatically inherit from the super pom.xml. All projects inherit from the configuration of their parent project. It is possible to create relationships between parent and child projects.

Maven Project Inheritance

Assuming a project is divided in several modules, each module is a maven project in itself. The parent's pom.xml would be like:
<project>
    <modelVersion>4.0.0</modelVersion>
    <groupId>com.mygroupid</groupId>
    <artifactId>myprojectparent</artifactId>
    <version>1.0.0</version>
</project>
This parent project inherits of the super pom.xml. A child module project would declare its parent relationship like this:
<project>
    <parent>
        <groupId>com.mygroupid</groupId>
        <artifactId>myprojectparent</artifactId>
        <version>1.0.0</version>
    </parent>
    <modelVersion>4.0.0</modelVersion>
    <artifactId>mymoduleproject</artifactId>
</project>
The child module project does not inherit of the super pom.xml. By not specifying a group id or a version, it inherits these from its parent. The parent's pom.xml must be located in the directory above this module project. Else, the location must be specified relative to this module's pom.xml file. For example:
    <relativePath>.../parentDir/pom.xml</relativePath>

Maven Project Aggregation

There is another way to establish a relationship between a parent project and child projects: project aggregation. Instead of declaring a parent project in the child project, the parent project declares modules:
<project>
    <modelVersion>4.0.0</modelVersion>
    <groupId>com.mygroupid</groupId>
    <artifactId>myprojectparent</artifactId>
    <version>1.0.0</version>
    <packaging>pom</packaging>
    <modules>
        <module>mymoduleproject</module>
    </modules>
</project>
The parent project's packaging must be set to pom and the pom.xml of child module projects must be located in directories bearing the module's name. Else, the module path must be specified relative to the
parent's pom.xml:
    <module>../myModuleDir/mymoduleproject</module>
If one compiles the parent project (or performs any other action on it), all its modules are compiled too.

REM: In this configuration, there is no inheritance between child projects and the parent project (only aggregation). Hence, child projects do not inherit of the parent's configuration. All projects of this aggregation inherit of the super pom.xml. They each have a life of their own.

Friday, 31 August 2012

Introduction to Spring Security Concepts

Spring security is a complex subject, with a steep learning curve. The purpose of this post is to try to reduce that learning curve and to be a reminder of the main security concepts every developers should master in order to configure security in Spring applications.

It is a not a substitute to reading the official documentation, especially the Spring security appendix describing the nuts and bolts of configuration elements. The Spring security 3 book is also helping connecting dots between concepts.

Facts

  • Authentication and Access Authorization – The main philosophy of Spring security is first to authenticate users, then to check their access credentials to resources. This is performed via a set of filters.
  • Annotation based configuration – So far, there is no such thing as Java based configuration with Spring security. Everything is based on XML configuration. You will not get rid of security.xml with Java programmatic configuration.
  • <servlet-name>-security.xml – One must specify the location of the security configuration XML file either in the contextConfigLocation parameter value (*) of web.xml or, if one uses configuration annotations, it can be imported with @ImportResource (**).
  • web.xml – One must configure the Spring security filter chain in the web.xml file (***) together with a filter mapping configuration to enable the Spring security.
  • Security Annotations - It is possible to enable JSR-250 annotations or Spring's @Secured annotations. Typically, these are used on services objects for access control.

Concepts

  • Auto-Config – A configuration element of the Spring Security namespace enabling (or not) the default configuration of Spring Security.
  • Access Decision Manager – Decides whether a user can access a resource or not.
  • Authentication Manager – It processes authentication requests via child authentication providers.
  • Authentication Provider – Depending on its accepted types of authentication requests, it processes them for approval or not.
  • Delegating Filter Proxy – A servlet filter capturing every user requests and sending them to the configured security filters to make sure access is authorized.
  • Principal – Represents anyone authenticated.
  • Provider Manager – An authentication manager instance processing authentication request through a list of authentication providers.
  • Security Context – A user's secured authenticated session. It is stored in a security context repository.
  • Session Authentication Strategy – Should a user have a session? Should we retrieve any existing ones? Should we automatically create one at each login? How many sessions can a user have? What about timeout? What's the strategy for session handling?

General Scheme

For a secured page, the general functional behavior of Spring security is the following:
  1. A user makes a request for a secured page.
  2. The configured Authentication Manager checks the user credentials.
  3. If necessary, the user provides them (for example, login and password).
  4. If the credentials are not validated successfully, access to the page is refused.
  5. The configured Access Decision Manager then makes sure the identified user has the right to access the page (i.e. has proper authority).
  6. If the authority is not established, access to the page is refused.
  7. Else, the page is displayed.

Security Filters

Every user requests pass through a set of filters. The Authentication Manager and the Access Decision Manager are both filters, functionally speaking. When auto-config is enabled, a set of defaut Spring security filters is automatically configured.

Here is how user queries are processed in more details:
  1. When a user makes a request, Spring loads its security context.
  2. If the user's request URL is the logout URL (by default /j_spring_security_logout), the user is logged out.
  3. If the user's request URL is an authentication form submission (by default  /j_spring_security_check), an attempt to authenticate the user is performed.
  4. If no login page is configured, a default login page is displayed (if the user is not authenticated yet).
  5. Checks whether the request has an Authorization header. If yes, user name and password is extracted for authentication. If authentication is successful, it is registered in the security context.
  6. Assuming a user was trying to access a page requiring authentication, this step retrieves the original request to that page, if the authentication is successful.
  7. The user request is wrapped together with the security context into a single object.
  8. If the user has not been authenticated successfully so far, it is flagged as anonymous.
  9. If the user has been authenticated, the session authentication strategy is applied. 
  10. Any AccessDeniedException and AuthenticationException thrown by any of the above are handled here.
  11. Delegation of authorization and access control decisions to an access decision manager.

Security Namespace

Spring security is defined in an XML document, just like maven configuration is defined in a pom.xml file. It has a namespace (i.e., a set of XML tag elements) which can be used to activate or configure Spring security features. Again, read the Spring security appendix to learn about these in details. It is a must to understand Spring Security.

Some of its main elements are:
  • <html auto-config='true'> - It is the parent element of web related configuration elements. It creates the filter chain proxy bean called springSecurityFilterChain for security. It has an auto-config attribute, which can be set to install the default Spring security configuration elements.
  • <access-denied-handler> - Can be used to set the default error page for access denials.
  • <intercept-url pattern="/**" access="ROLE_USER"> - This element creates a relationship between a set of URLs and the required access role to visit these pages.
  • requires-channel - This is an <intercept-url> attribute which can be used to require the usage of https to access a set of URLs (i.e., secured channels).
  • <form-login> - Can be used to define the login page URL, the URL for login processing, the target URL after login, the login failure URL, etc...
  • <remember-me> - If a user is not authenticated, and 'remembered' information about the user is available (for example, from a cookie), it will be used.
  • <session-management> and <concurrency-control> - To implement session management strategies.
  • <logout> - To configure the default logout page.
  • <http-firewall> - To implement a firewall filter.
  • <authentication-manager> - A required configuration element. It creates a provider manager. The child elements are <authentication-provider>.
  • <authentication-provider> - Can be used to create an in-memory authentication provider. The children <user-service> and <user> elements can be used to define user login-password combinations. Other types of authentication providers can be configured too.
  • <password-encoder> - If the users' login and password are stored in a database (for example), one can use this configuration element to specify how the password should be encrypted.

For a concrete Spring Security example, click here • More Spring related posts here.

REM: This blog does not cover all Spring Security features. Topics such as: password encryption, storage of credentials, 'Remember Me', SSL connections, sophisticated access control, OpenID, LDAP, Client Certificate Authentication in the Spring Security 3 book in details.

------------------------------------------------------------

(*)
<context-param>
  <param-name>contextConfigLocation</param-name>
  <param-value>
    /WEB-INF/myApp-security.xml
  </param-value>
</context-param>

(**)
@Configuration
@ImportResource("classpath:my/package/security.xml")
public class ApplicationConfig {

    // ...

}
(***)
<filter>
  <filter-name>springSecurityFilterChain</filter-name>
  <filter-class>org.springframework.web.filter.DelegatingFilterProxy</filter-class>
</filter>
<filter-mapping>
  <filter-name>springSecurityFilterChain</filter-name>
  <url-pattern>/*</url-pattern>
</filter-mapping>

Friday, 24 August 2012

JPA Tutorial with Examples using Hibernate in Standalone

This post is the starting point of a JPA introduction tutorial based on operational examples. It relies on a standalone usage of Hibernate. All code examples are available from Github in the JPA directory. Some error messages will be displayed when running some examples because of a known and harmless issue.

The following posts can be read individually or as a sequence:

Basics

Inheritance

Relationships

Criteria API


REM: This introduction tutorial does not cover for all features of the persistence package, but is enough to get started and write applications. More posts may be added in the future.

Friday, 17 August 2012

JPA EntityManager and Related Concepts Introduction

The JPA EntityManager is the key tool facilitating transactions between JPA annotated Java objects and the configured database (or data storage).

Persistence Unit

A persistence unit is a set of entity classes managed by an entity manager in an application. Typically, a persistence unit is associated with a single datastore.

Persistence units are defined in a persistence.xml file which must be located in the /META-INF directory within the .jar of applications using JPA.

Persistence Context

All transactions are performed within a context called a persistence context. If one wants to update an existing data record, this is not performed 'out of the blue'. The data is first fetched via the entity manager from the database (a context), updated and saved in the database. The persistence context is in between the database and the application. It is managed by the entity manager. It is not the database itself.

Entity Manager Factory

Every entity manager instance is created via an entity manager factory. In a web application (running in a container), a unique instance of an entity manager can be obtained with the persistence context annotation:
@PersistenceContext
EntityManager em;
In a standalone application, an entity manager factory instance can be retrieved from a bootstrapping class called Persistence. Then, entity manager instances can be created from it:
private static final EntityManagerFactory EMF
    = Persistence.createEntityManagerFactory("EMF name");
private static final EntityManager EM
    = EMF.createEntityManager(); Depending 
If implemented, the 2nd level cache may be retrieved from the factory. This is where entity instances are shared between entity managers created from it. A persistence unit utility can also be retrieved from the factory to retrieve ids of entities, or to check whether these are currently loaded. However, it is not common practice to use it directly.

Entity Lifecycle

This is a key concept in JPA. One cannot use the entity manager without understanding the life cycle of entities. Users create, delete, update entities in their applications. One has to handle the fact that such entities may or may not be known by the persistence context. If unknown, their id value (or persistent identity) are also unknown to the persistence context. This happens when the id value is generated automatically by the database for example.

Therefore, JPA defines a set of statuses for entities:
  • New - A user creates an instance of a JPA annotated object, but has not saved/persisted it. It is unknown to the persistence context, like its persistent identity.
  • Managed - A user creates an instance of a JPA annotated object and has saved it, or it has retrieved it from the database. In all cases, the entity is known by the persistence context.
  • Detached - Any entity which used to be known by the persistence context, but which has been explicitly detached from it. Whatever happens to this entity is unknown to the persistence context, unless it is re-associated to it.
  • Removed - An entity known by the persistence context, but which is to be removed from the database soon.
REM: the status of an entity is influenced by the success or not of transactions. For example, it can become detached if a transaction fails.

Entity Manager Uses

The main uses of the entity manager are:
  • Finding Entities or a Reference to an Entity - Reads an entity from the database. Eventually, the read is delayed until the entity is used (lazy read).
  • Persisting an Entity - Creates a record in the database for the entity. Fails if it already exists.
  • Merging an Entity - Updates the record in the database for the entity. Creates it if it does not exist.
  • Refreshing an Entity - Updates the content of the entity from data in the database. Erases any changes made in the application and not persisted.
  • Remove an Entity - Deletes the record corresponding to the entity, in the database.
  • Detaching an Entity - Modifications to the entity won't be handled by the persistence context anymore.
  • Lock Entities - Helps avoiding concurrent modification issues.
  • Flushing Entities - Synchronizing the persistence context with the database.
  • Accessing the meta-model - To learn about known entities, embeddables and managed types.
  • Creating Transactions - This allows grouped operations, with commit and rollback.
  • Creating Queries - To create SQL like queries.
  • Clear - Detaches all managed entities.

About Updates Made To Entities in the Application

  • If an entity is detached or new, any modifications made to it will not be persisted in the database, ever.
  • If an entity is managed, any modifications made to it will be persisted if it is persisted, merged or if flush is called on the entity manager.

Wednesday, 15 August 2012

Pojomatic for Equals(), HashCode() and toString()

From the website itself: "Pojomatic provides configurable implementations of the equals(Object), hashCode() and toString() methods inherited from java.lang.Object"

This is best described with an example (available on Github, in the Introduction-To-Pojomatic directory):
@AutoProperty
public class Item {

    @Property(policy=PojomaticPolicy.EQUALS_TO_STRING)
    private long id = 0;

    private String description = "";

    @Property(policy=PojomaticPolicy.NONE)
    private transient int transientData;

    @Override
    public boolean equals(Object o) {
        return Pojomatic.equals(this, o);
    }

    @Override
    public int hashCode() {
        return Pojomatic.hashCode(this);
    }

    @Override
    public String toString() { 
        return Pojomatic.toString(this);
    }

    // Constructors, Setters & Getters...

}
Notice that equals(), hashCode() and toString() are overriden to call Pojomatic.

The @AutoProperty annotation enables Pojomatic on an class. It has two optional properties:
  • The auto detect policy indicates whether FIELDs or METHODs should be searched for properties to take into account. The search can also be disabled with NONE. By default, the FIELDs are searched for.
  • The default Pojomatic policy which indicates whether the properties are going to be included in equals(), hashCode() and toString(). By default, the policy is set to ALL. Other values are: EQUALS, EQUALS_TO_STRING, HASHCODE_EQUALS, NONE, TO_STRING.
The class level configuration can also be overridden at the field (or method) level with the @Property annotation. It also has two properties:
  • The name, which identifies the property in toString().
  • The policy, which is very similar to the default Pojomatic policy, but at the field/method level. It can take the same values, plus one: DEFAULT, which means 'the class level policy' (or ALL if none is defined).
The following:
Item item = new Item();
item.setDescription("Blue furniture");
item.setId(123456);
item.setTransientData(9999);

System.out.println("equals   : " + item.equals(new Object()));
System.out.println("hashCode : " + item.hashCode());
System.out.println("toString : " + item.toString());
Generates the following output:
equals   : false
hashCode : -2089463829
toString : Item{id: {123456}, description: {Blue furniture}}
Pojomatic also offers:
  • a feature to control formatting in toString()
  • a mean to prevent a subclass from overridding equals()
  • Assuming B extends A, but you don't want an instance of B to be equal to an instance of A ever, there is a mean to notify Pojomatic
  • Assuming B extends A, and you would like to retrieve the difference in terms of properties used to compute equals(), Pojomatic.diff(...) provides this information
  • One can retrieve the Pojomator used to compute equals(), hashCode() and toString(); it also contains an interesting isCompatibleForEquality() method to check whether another class can be used in equals()

Thursday, 9 August 2012

JAXB Annotation - XmlAdapter, Map, Special Types Annotations

Code examples are available from Github in the JAXB-JSON-XML-Marshalling directory.

How to use XmlAdapter and @XmlJavaTypeAdapter to handle Map in JAXB?

In situations where JAXB cannot handle unknown types, the solution is to create an XmlAdapter and use the @XmlJavaTypeAdapter in the class referring to the unknown type to indicate JAXB how to deal with it. A Java map is a good example.

We are going to illustrate this with an example. Assuming an object containing a generic map:
@XmlRootElement
public class ObjectWithGenericMap<K, V> {

    private Map<K,V> map;

    @XmlElement
    @XmlJavaTypeAdapter(JaxbMapAdaptor.class)
    public Map<K,V> getMap() {
        return map;
    }

    public void setMap(Map<K,V> map) {
        this.map = map;
    }

}
We are going to need an adaptor:
public class JaxbMapAdaptor<K, V>
        extends XmlAdapter<JaxbMapToList<K, V>, Map<K, V>> {

    @Override
    public Map<K, V> unmarshal(JaxbMapToList<K, V> v)
            throws Exception {
        HashMap<K, V> result = new HashMap<K, V>();
        for (JaxbMapToListEntry<K, V> jme : v.getList()) {
            result.put(jme.getKey(), jme.getValue());
        }
        return result;
    }

    @Override
    public JaxbMapToList marshal(Map<K, V> v) throws Exception {
        JaxbMapToList<K, V> result = new JaxbMapToList<K, V>();
        for (Map.Entry<K, V> entry : v.entrySet()) {
            JaxbMapToListEntry<K, V> jme = new JaxbMapToListEntry<K, V>();
            jme.setKey(entry.getKey());
            jme.setValue(entry.getValue());
            result.getList().add(jme);
        }
        return result;
    }

}

Basically, the above adaptor converts a map into a list of entries (with key and value) when marshalling, and converts this list of entries back into a HashMap when unmarshalling.

The map-to-list and corresponding entries are:
public class JaxbMapToList <K, V> {

    private List<JaxbMapToListEntry<K, V>> list
        = new ArrayList<JaxbMapToListEntry<K, V>>();

    public JaxbMapToList() {}

    public JaxbMapToList(Map<K, V> map) {
        for (Map.Entry<K, V> e : map.entrySet()) {
            list.add(new JaxbMapToListEntry<K, V>(e));
        }
    }

    public List<JaxbMapToListEntry<K, V>> getList() {
        return list;
    }

    public void setList(List<JaxbMapToListEntry<K, V>> entry) {
        this.list = entry;
    }

}

public class JaxbMapToListEntry<K, V> {

    private K key;
    private V value;

    public JaxbMapToListEntry() { }

    public JaxbMapToListEntry(Map.Entry<K, V> e) {
        key = e.getKey();
        value = e.getValue();
    }

    @XmlElement
    public K getKey() {
        return key;
    }

    public void setKey(K key) {
        this.key = key;
    }

    @XmlElement
    public V getValue() {
        return value;
    }

    public void setValue(V value) {
        this.value = value;
    }

}
Assuming one instantiates the object with generic map with destination and transports:
@XmlRootElement
public class Destination {

    private String destination;

    public String getDestination() {
        return destination;
    }

    @XmlElement
    public void setDestination(String dest) {
        this.destination = dest;
    }

}

@XmlRootElement
public class Transport {

    private String transport;

    public String getTransport() {
        return transport;
    }

    @XmlElement
    public void setTransport(String transp) {
        this.transport = transp;
    }

}

public static void main(String[] args) throws JAXBException {

    JAXBContext jaxbContext = JAXBContext.newInstance(
        ObjectWithGenericMap.class,
        Destination.class, Transport.class);

    ObjectWithGenericMap<Destination,Transport> owgm
        = new ObjectWithGenericMap<Destination,Transport>();

    Map<Destination,Transport> map
        = new HashMap<Destination,Transport>();
    owgm.setMap(map);

    Destination d = new Destination();
    d.setDestination("Paris");

    Transport t = new Transport();
    t.setTransport("Plane");

    map.put(d,t);

    d = new Destination();
    d.setDestination("New-York");

    t = new Transport();
    t.setTransport("Boat");

    map.put(d,t);

    ObjectWithGenericMap<Destination,Transport> retr
        = marshallingUnmarshalling(jaxbContext, owgm);

    for (Entry<Destination, Transport> e : retr.getMap().entrySet() ){
        Destination retrd = e.getKey();
        System.out.print(retrd.getDestination());
        Transport retrt = e.getValue();
        System.out.println(" " + retrt.getTransport());
    }

}
The generated XML and verification is:
<?xml version="1.0" encoding="UTF-8" standalone="yes"?>
<objectWithGenericMap>
    <map>
        <list>
            <key xsi:type="destination" xmlns:xsi="http://www.w3.org/2001/XMLSchema-instance">
                <destination>New-York</destination>
            </key>
            <value xsi:type="transport" xmlns:xsi="http://www.w3.org/2001/XMLSchema-instance">
                <transport>Boat</transport>
            </value>
        </list>
        <list>
            <key xsi:type="destination" xmlns:xsi="http://www.w3.org/2001/XMLSchema-instance">
                <destination>Paris</destination>
            </key>
            <value xsi:type="transport" xmlns:xsi="http://www.w3.org/2001/XMLSchema-instance">
                <transport>Plane</transport>
            </value>
        </list>
    </map>
</objectWithGenericMap>
Paris Plane
New-York Boat

How to use: @XmlList, @XmlEnum, @XmlAttribute, @XmlValue, @XmlMimeType, @XmlInlineBinaryData?


To annotate an enum:
@XmlEnum
public enum MyEnum {

    @XmlEnumValue("v1")
    VAL_1,

    @XmlEnumValue("v2")
    VAL_2;

}
To specify the xml tag value and attributes:
@XmlAccessorType(XmlAccessType.FIELD)
public class SpecialItem {

    @XmlValue
    private String val;

    @XmlAttribute
    private String attribute1;

    @XmlAttribute
    private String attribute2;

    // Setter & Getters...

}
For remaining annotations and usage of the above:
@XmlAccessorType(XmlAccessType.FIELD)
@XmlRootElement
public class MultipleTypes {

    @XmlElement
    private MyEnum myEnum;

    @XmlElement
    @XmlList
    private List<String> data;

    @XmlElement
    private List<SpecialItem> specialItems;

    @XmlMimeType("image/jpeg")
    private Image image;

    @XmlInlineBinaryData
    private byte[] byteArray;

    // Setter & Getters...

}
The generated XML and verification is:
<?xml version="1.0" encoding="UTF-8" standalone="yes"?>
<multipleTypes>
    <myEnum>v2</myEnum>
    <data>tre pml xng</data>
    <specialItems attribute2="ffff" attribute1="aaaa">pppp</specialItems>
    <specialItems attribute2="pqgd" attribute1="mer">xxw</specialItems>
    <image>/9j/4AAQSkZJRgABAgAAAQABAAD/2wBDAAgGBgcGBQgHBwcJCQgKDBQNDAsLDBkSEw8UHRofHh0aHBwgJC4nICIsIxwcKDcpLDAxNDQ0Hyc5PTgyPC4zNDL/2wBDAQkJCQwLDBgNDRgyIRwhMjIyMjIyMjIyMjIyMjIyMjIyMjIyMjIyMjIyMjIyMjIyMjIyMjIyMjIyMjIyMjIyMjL/wAARCAALABADASIAAhEBAxEB/8QAHwAAAQUBAQEBAQEAAAAAAAAAAAECAwQFBgcICQoL/8QAtRAAAgEDAwIEAwUFBAQAAAF9AQIDAAQRBRIhMUEGE1FhByJxFDKBkaEII0KxwRVS0fAkM2JyggkKFhcYGRolJicoKSo0NTY3ODk6Q0RFRkdISUpTVFVWV1hZWmNkZWZnaGlqc3R1dnd4eXqDhIWGh4iJipKTlJWWl5iZmqKjpKWmp6ipqrKztLW2t7i5usLDxMXGx8jJytLT1NXW19jZ2uHi4+Tl5ufo6erx8vP09fb3+Pn6/8QAHwEAAwEBAQEBAQEBAQAAAAAAAAECAwQFBgcICQoL/8QAtREAAgECBAQDBAcFBAQAAQJ3AAECAxEEBSExBhJBUQdhcRMiMoEIFEKRobHBCSMzUvAVYnLRChYkNOEl8RcYGRomJygpKjU2Nzg5OkNERUZHSElKU1RVVldYWVpjZGVmZ2hpanN0dXZ3eHl6goOEhYaHiImKkpOUlZaXmJmaoqOkpaanqKmqsrO0tba3uLm6wsPExcbHyMnK0tPU1dbX2Nna4uPk5ebn6Onq8vP09fb3+Pn6/9oADAMBAAIRAxEAPwCxBe6S1ha3ptg4MEYF29lGSXKA5JIznHvmuX1UaCmhapbwxW2023mxkWUSyedsbjPXaOTkdPX+9wieM/EEOlrpkeoEWS7SIfKQj5Rgfw88AflUb+JdVl0O7tHniMMkqbh9njDcq4Pzbcjj0PrXppRo3SuTVqVKrV7aH//Z</image>
    <byteArray>AQL9/A==</byteArray>
</multipleTypes>
pppp aaaa ffff
xxw mer pqgd
VAL_2
tre, pml, xng, 
1 2 -3 -4
Image is available: true

Remark

We have not covered all JAXB annotations, especially those related to XML schemas, but this tutorial should be enough to get one started and accomplish most objectives with JXTA.

JAXB to XMLJAXB to JSONJAXB Annotations Tutorial Table Of Content